After setting up Locations, follow these steps to set up the information to be included on all Forecasts, in the Executive Summary and on the Daily Planners.
First
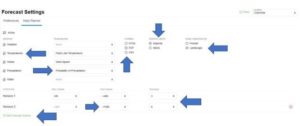
- Start by selecting Forecast Settings in the Settings menu (upper right corner).
Select Location
- Now, select a location from the list. Setting up locations is covered here.

Settings Triggers
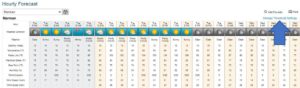
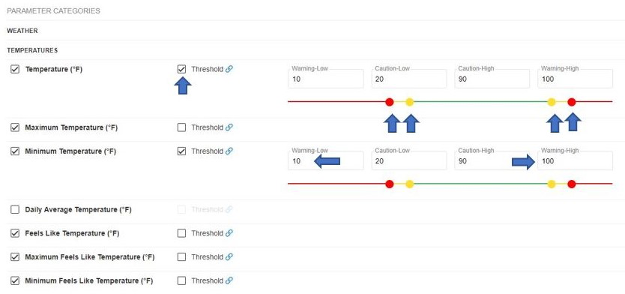
- Select each parameter that applies to your operation and you would like to appear on your Hourly Forecast, 15-Day Forecasts, in the Executive Summary and on your Daily Planners. More on setting up the Executive Summary here and on Daily Planners here.
- Turning on and off parameters will add and remove those parameters from all forecasts attached to that location.
- Select the threshold box to color code the parameter in the forecasts. Either type into the boxes the numerical values for the Low and High values of the trigger or use the slide bar to set the values.
- You do not need to specify thresholds to have the parameter be forecasted for. The thresholds color codes the forecasts in the event of severe weather when the threshold is met.
Daily Planner
- The Daily Planners are a new detailed forecast including, daily summaries, hourly forecasts and meteograms for your operations most pertinent weather conditions.
- After you have turned on the triggers and parameters to appear in your Daily Planners, you can further customize how you want your forecast to appear.
- First, turn the Daily Planners on. Select the Active button.
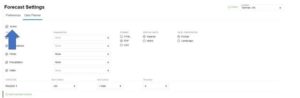
- Second, customize what graphs you would like to include beneath your hourly forecast, choose your delivery format, units, view and temporal scale for the numerical forecast.
- The horizons represent the temporal scale that the forecast will extend out and at what intervals. All parameters selected will be forecasted for at the intervals specified.
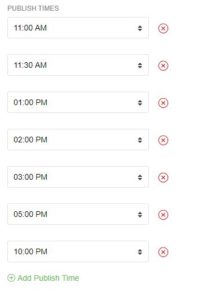
- Finally, choose when you would like to receive your forecast. You can receive at 30 minute intervals with a maximum of eight forecasts a day. These times are in the local time of the asset unless specified in the creation of the asset to use a different time zone.
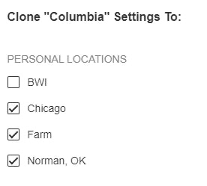
Cloning
- Have numerous locations and want the same settings for all the location, not a problem! You can use the Clone button to copy the forecast settings for the current asset to any of your other assets. This will clone the forecast trigger preferences and daily planner settings.

Tips
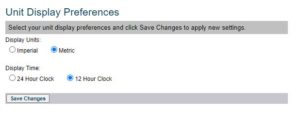
- To change the units reflected on all forecasts navigate to Preferences in the Settings menu (upper right corner).
- Select the units to best reflect your operational needs
- We’ve linked the forecasts settings within your hourly forecasts, so you can view your hourly forecasts and go directly to the page to change any parameters or triggers.